
Finally, the time has come again: the grilling season is open! But before you dive into steaks, sausages, and vegetables, the first challenge awaits: lighting the grill. Don’t worry, with the right technique and a few tricks, it’s really easy!
In this guide, you’ll learn step by step how to safely and quickly light your grill, whether you prefer charcoal or briquettes. We’ll also share which tools make the job easier and how to achieve optimal embers and perfect grilling results.
Table of Contents
Choosing the Coal: Charcoal or Grill Briquettes?
Lighting the Grill with a Chimney Starter
Lighting the Grill without Firelighters
More Tips for Lighting the Grill
Grilling Made Easy: A Quick Guide
Choosing the Coal: Charcoal or Grill Briquettes?
Before you ignite the embers and bring the grill to life, you face an important decision: charcoal or Grill briquettes? Both have their own characteristics to consider.
Chunky charcoal is the turbo among fuels. It catches fire lightning-fast and quickly heats up the grill. However, it also burns out just as fast, which means you might need to add more often, especially when the grill party is in full swing. For spontaneous grill evenings or if you just want to throw something on the Grilling Grate quickly, chunky charcoal can be just the thing.
On the other hand, we have the reliable Grill briquettes. They take a bit longer to get fully glowing, but once they reach their optimal temperature, they provide even and long-lasting heat. Perfect for extended grill parties where you want to make sure the embers don’t let you down, especially if you’re expecting a crowd of hungry guests.
Ultimately, the choice of fuel depends on your individual needs and planned grilling activities. It’s worth trying both to find out which suits you and your grilling style better. Because at the end of the day, it’s all about enjoying your grilling time to the fullest.

Lighting the Grill with a Chimney Starter
Grilling without the stress of long waiting? With a chimney starter, it’s a breeze! Experts swear by it – it’s still the easiest and fastest way to get your grill going. Here’s how it works:
- Fill the chimney starter to the top with charcoal. Make sure to observe the maximum fill level if the chimney has a marking! Then place the chimney starter on a fireproof surface – this can be a concrete slab or your grill itself.
- Light the charcoal in the chimney starter. There are two methods: the classic way is to place a suitable firelighter under the chimney starter so the flames draw up through the charcoal from below. This creates a cool chimney effect, so the heat quickly rises and gets the charcoal glowing fast. Alternatively, you can place the firelighter in the upper quarter of the charcoal, so the chimney starter burns from top to bottom. This takes a bit longer but reduces smoke and emissions.
- Now wait until the firelighter has burned out and the charcoal is glowing through. Depending on environmental conditions (temperature, wind, etc.), this takes about 10 to 15 minutes. If you don’t want to wait that long, grab the Quick Glow Quick Booster – it gets your charcoal grill-ready in just 8 minutes in the chimney starter! You can find the Quick Booster below in the product stream, if it’s not already sold out.
- Once the charcoal is nicely glowing, pour it from the chimney starter into the grill – and voilà, the perfect embers are ready!
Remember to wear grill gloves when transferring the coals – not all chimney starters have perfectly insulated handles. Be careful when emptying the chimney starter into the Grilling Grate to avoid sparks flying. And don’t forget to pay attention to the quality of the chimney starter – cheap models can be prone to rust.
Good to Know: Constant and steady airflow is crucial. The so-called operating temperature is reached when the coals or briquettes are all glowing but not burning. Rule of thumb: what’s white is glowing. With some experience or luck, the embers will have worked their way from the inner core to the outside after about ten minutes.
Lighting the Grill without Firelighters
How do I light my grill if I don’t have any firelighters on hand? No problem! There are plenty of tricks to get the fire going without relying on special aids. Forget the boring standard method – here are some creative ideas:
- Egg carton with wax drops: Grab an old egg carton and fill it with sawdust or paper scraps. Then drip some wax on it and let it cool. Once it’s solid, place the carton under the charcoal and light it. Voilà, your homemade firelighter!
- Dry pine cones with wax: Collect some dry pine cones and dip them in melted wax or soak them well. After they dry, place them under the charcoal and light them. These little things are real fire starters!
- Newspaper wrapped around a bottle: Take a newspaper, roll it into strips, and wrap it around a bottle. Then place the wrapped bottle on the Grilling Grate, cover it with charcoal, and carefully pull the bottle out. Now just light the paper and you’re ready to go!

More Tips for Lighting the Grill
- The perfect spot: Choose a solid, level surface for the grill. Nobody wants the thing tipping over while sizzling and the steak ending up on the ground.
- Look around: Check the surroundings! No flammable stuff nearby, please. No newspapers, dry wood, or grass – otherwise, the grill party could quickly turn into an unwanted campfire. Also, keep kids and the dance floor at a safe distance; we don’t want heat waves outside the grill.
- Safety first: Keep a fire blanket, sand, or fire extinguisher handy at all times. Water is great for quenching thirst but not necessarily for putting out grill fires. And don’t forget the apron and gloves, because hot fat splashes are definitely not what you want.
- Less is more: When lighting the grill, the motto is “less is more.” Too much starter fluid could turn your grill party into a fireworks show. Liquid firelighters like kerosene or turpentine? Please no. That’s like an invitation to fire spirits. And methylated spirits? No thanks, we want bratwurst, not flamethrowers.
- Coal know-how: Charcoal or Grill briquettes – that’s the question. Both must be dry, or it won’t work. And think about the environment! Make sure your coal is sustainably produced. Grill briquettes burn longer and more evenly, but charcoal also gives a quick kickstart.
Grilling Made Easy: A Quick Guide
Step 1: Stack the Coal
To get started, fill about half of the required charcoal into the Griddle Plate and form a nice pyramid. If you’re unsure how much coal you need, start with a small amount. You can always add more once the first batch is glowing through.
Step 2: Place the Firelighter
Place the firelighter according to the manufacturer’s instructions on or between the pieces of coal. Below you’ll find an overview of different firelighters.
Step 3: Light the Coal
Ignite the firelighter or the coal with a long match or lighter. Charcoal glows faster than briquettes, so you can light it about 20 to 30 minutes before planned grilling. For briquettes, allow a bit more time.
Step 4: Ensure Airflow
Fire needs air! Fan air to the coal with a piece of cardboard, a hairdryer, or a bellows to help it glow better.
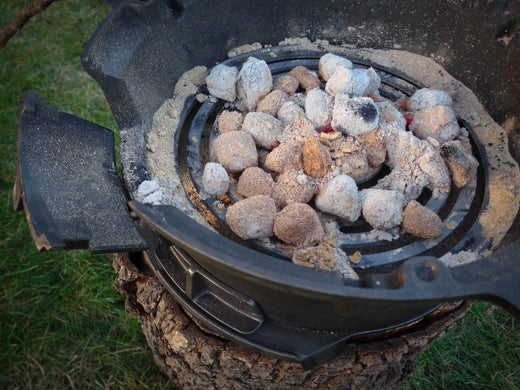
Step 5: Add More Coal
After about 20 minutes, the coal should be glowing through and show a white ash layer. Now add the rest of the coal and let everything glow through again. Once the coal is almost completely covered with ash, you can start grilling.
Ready for the next grill party? Get more tips and recipes in our other articles to create the perfect BBQ!
Here you’ll find tips and tricks for your next grill party
Grilling with Cast Iron: From the Griddle Plate to the Dutch Oven
Winter Grilling: Tips and Recipes
Petromax Grill Gadgets: How to Get the Most Out of Your Grill Evening


