
Halloween is just around the corner, and so is the time for spooky pumpkin lanterns. But which pumpkin is best for carving? And how do you create the perfect pumpkin face with little effort? In this article, we show you step by step how to create your own Halloween pumpkin. From the right pumpkin variety to the right tools and tips for durability – here you’ll find everything you need to know.
Everything you need for pumpkin carving: The right tools
Carving a pumpkin step by step: How to create the perfect Halloween decoration
The best time to carve your pumpkin: How to keep your lantern fresh
Make your pumpkin last longer: How to keep your lantern fresh
Halloween traditions: When does the pumpkin go outside?
The best pumpkin variety for your Halloween lantern: How to find the perfect pumpkin
Halloween is just around the corner, and with it the time when pumpkins are turned into spooky faces. But not every pumpkin is equally suitable for your Halloween decoration. Choosing the right variety is crucial to create the perfect piece.

Which pumpkin variety is the right one?
The selection of pumpkin varieties is huge. But which ones are best for carving? Here are some of the most popular varieties:
- St. Martin lantern pumpkin: The classic among carving pumpkins. It has an oval shape, a firm skin, and orange flesh. Its size is ideal for large, detailed carvings.
- Tom Fox: This variety is also very popular and available in many shapes and sizes. It is sturdy and easy to work with.
- Hokkaido: The Hokkaido is not only popular in the kitchen but also excellent for carving. Its orange color and slightly thicker skin make it a durable choice.
- Butternut: The butternut is somewhat unconventional due to its elongated shape and smooth surface, but still very suitable for carving.
- Butternut squash: With its slightly elongated shape and smooth surface, the butternut squash offers a nice base for your Halloween creation.
What should you look out for when buying?
- Firmness: The pumpkin should be firm and heavy. Soft spots or pressure marks indicate poor quality.
- Skin: The skin should be as smooth and undamaged as possible. Cracks or holes can make carving more difficult and reduce shelf life.
- Stem: The stem should be firmly attached to the pumpkin. A dry or falling-off stem is a sign that the pumpkin is no longer fresh.
- Color: The color of the pumpkin is a matter of taste. Whether you prefer a classic orange pumpkin or a more colorful variety is up to you.
Why not all pumpkins are the same
Not every pumpkin that is round and orange is suitable for carving. For example, ornamental pumpkins are often too soft or have a skin that’s too thin. Edible pumpkins like Hokkaido can be carved but their flesh is often softer than that of special carving pumpkins.
Tips for choosing
- Visit a pumpkin farmer: You’ll usually find a wide selection of different pumpkin varieties here.
- Feel it through: Tap the pumpkin. It should have a hollow sound.
- Weight: A heavy pumpkin is usually firmer.
Choosing the right pumpkin variety is the first step to a successful Halloween decoration. With the right tips and tricks, you’ll definitely find the perfect pumpkin for your spooky lantern.

Everything you need for pumpkin carving: DThe right tools
After choosing the perfect pumpkin, it’s time to put your Halloween idea into practice. The right tools are crucial for precise and safe work.
What you need for pumpkin carving:
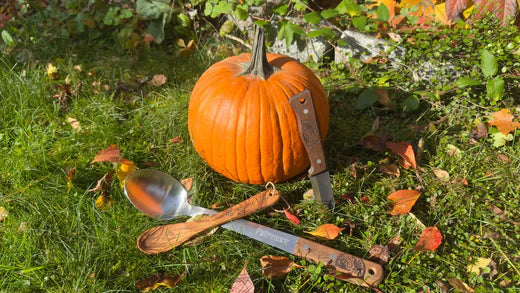
- Sharp knife: A sharp kitchen knife is the most important tool. A serrated knife makes cutting through the thick skin easier. We recommend our Bushcraft knife for this!
- Spoon: You can easily hollow out the pumpkin with a large spoon or an ice cream scoop. Find suitable spoons here!
- Pen: A water-soluble felt-tip pen is perfect for sketching your desired design on the pumpkin surface.
- Apron: An apron protects your clothes from stains.
- Gloves: Disposable gloves are recommended to protect your hands.
Additional tools for professionals
For detailed carving and more delicate patterns, the following tools can be useful:
- Pumpkin carving set: Special sets with various cutters and knives make cutting complex shapes easier.
- Drill: With a drill, you can make small holes for eyes or noses.
- Saw: A small saw can be helpful for larger cutouts.
Tips for the right tools
- Safety first: Make sure all tools are sharp and in good condition. Dull knives increase the risk of injury.
- Adjust size: Choose tools according to the size of your pumpkin and the complexity of your design.
- Children: When carving with children, always use blunt tools and ensure adult supervision.
Why good tools matter
A sharp knife and the right tools make carving much easier. You can work more precisely and reduce the risk of injury. Plus, it’s simply more fun when the tools fit the job.
Discover the right tools for pumpkin carving here!

Step-by-step pumpkin carving: Here’s how the perfect Halloween decoration comes together
After selecting the perfect pumpkin and gathering your tools, you can start carving. With a little patience and creativity, you’ll quickly create a spooky Halloween lantern. Here’s how!
1. Preparation
Before you start carving, find a suitable workspace. A large table that’s easy to clean is ideal. Lay out all the tools you’ll need, like a sharp knife, a spoon, a pen, and gloves. Choose a design for your pumpkin lantern. It can be a classic pumpkin face or a completely unique design.

2. Preparing the Pumpkin
Take your pumpkin and cut off a lid with a sharp knife. Make sure the lid is large enough to hollow out the inside easily. Use a spoon or an ice cream scoop to remove the flesh and seeds. Try not to make the pumpkin walls too thin so it stays sturdy.

3. Transferring the Design
Place your prepared template on the pumpkin and trace the outlines with a water-soluble pen. Adjust the template to fit the shape of your pumpkin if necessary. If you don’t have a template, you can also draw directly on the pumpkin.

4. Carving
Now it gets creative! Start with the outer contours of your design and slowly work your way inward. For fine details like eyes or a nose, you can use a smaller knife or a drill. Work carefully and apply some pressure to achieve clean cuts.
5. Finishing Touches
To avoid injuries, smooth the cut edges with a small spoon. Clean the pumpkin inside and out thoroughly with a damp cloth and then dry it well.

6. Lighting and presentation
Place a tealight or LED candle inside the pumpkin. Make sure the candle is stable and won’t tip over. Finally, find a nice spot for your finished pumpkin lantern.
The best time to carve your pumpkin: How to keep your lantern fresh
The question of when to carve your pumpkin is crucial for how long your Halloween lantern will last.
- Not too early: Don’t carve your pumpkin too long before Halloween. The longer a pumpkin has been carved, the faster it dries out and loses its color.
- Not too late: But don’t wait until the last moment either. It’s best to carve your pumpkin a few days before Halloween so you have enough time to create your masterpiece.
Why is timing so important?
As soon as you cut into a pumpkin, it begins to oxidize and lose moisture. The longer this process takes, the faster your pumpkin will become soft and mushy. By waiting for the right time, you give your pumpkin the best chance to stay fresh until Halloween.
Rule of thumb:
A good rule of thumb is to carve the pumpkin about 2-3 days before Halloween. This gives you enough time for designing and ensures your lantern still looks good on the big night.
Make your pumpkin last longer: How to keep your lantern fresh
A pumpkin mainly consists of water. Once you cut the skin, the water starts to evaporate. This process causes the pumpkin to dry out and lose its color. To slow down this process, there are various methods:
Tips for preservation:
- Petroleum jelly: Apply a thin layer of petroleum jelly to the cut surfaces. The jelly forms a protective layer and prevents moisture from escaping.
- Candle wax: Similar to petroleum jelly, candle wax can seal the cut surfaces and slow down the drying process.
- Hairspray: A light hairspray can also help retain moisture in the pumpkin. Spray the pumpkin lightly after carving.
- Lemon juice or vinegar: Dilute lemon juice or vinegar with water and spray it on the pumpkin. The acid acts as an antibacterial agent and helps prevent mold growth.
- Store cool: Place the carved pumpkin in a cool, dark place. Avoid direct sunlight.
- LED candle: Use an LED candle instead of an open flame. The heat from a candle dries out the pumpkin even more.
With these tips, you can significantly extend the lifespan of your pumpkin lantern. Try the different methods and find out which works best for you.

Halloween traditions: When does the pumpkin go outside?
The carved pumpkin has now become an indispensable symbol of Halloween. But when exactly does the pumpkin lantern go outside? And where does this tradition come from?
The story of the pumpkin at Halloween
The tradition of carving pumpkins at Halloween originates from an old Irish legend. It tells the story of a stingy blacksmith named Jack who outwitted the devil several times. When Jack died, he was allowed neither into heaven nor hell. So he wandered the earth as a ghost, carrying a lantern made from a hollowed-out turnip.
When Irish immigrants came to America in the 19th century, they found pumpkins instead of turnips. So they adopted the tradition and began carving pumpkins.
When does the pumpkin go outside?
There are no fixed rules about exactly when the pumpkin is put outside. Many people place their pumpkin lantern on the evening before Halloween to ward off evil spirits. Others decorate their house several days earlier.
Why do we put pumpkins out at Halloween?
- Deterrent for evil spirits: The spooky faces of the pumpkins are supposed to scare away evil spirits and protect the house.
- Guide for good spirits: At the same time, the glowing pumpkins are meant to guide good spirits.
- Tradition: Carving pumpkins is simply a lovely tradition that adds to the Halloween atmosphere.
The pumpkin is an important part of Halloween and represents a long tradition. When you put your pumpkin outside is up to you. The main thing is to have fun!
From colorful leaves to cozy campfires – autumn has so much to offer! Check out our other articles and get inspired for great autumn activities:
Hiking in autumn: How it strengthens your health
Staying active outdoors despite bad weather – How to keep your motivation high
Hiking or trekking: Which Adventure suits you?
Campfire in the garden: Everything you need to know


